


区块绑定API是区块编辑器中的一个强大工具,它允许您将任何数据源连接到块的属性中。该 API 最初在 WordPress 6.5 中引入,并在其初始实现中,使 WordPress 用户能够在文章和页面中显示自定义字段的值。区块绑定 API 是其他强大 WordPress 功能的基础。例如,同步模式覆盖和在 WordPress 6.9 中引入的 Post Date 区块变体。
那么,区块绑定 API 是什么?它有什么用途?主题铺将提供一个简单的介绍,并通过一个实际示例展示如何在 Gutenberg 区块和外部数据源之间创建绑定。介绍WordPress区块绑定API是什么,以及使用它来构建动态网站。
区块绑定 API:基本概念
如上所述,区块绑定 API 允许您在数据源和区块属性之间创建绑定。
如果您不熟悉区块属性,请前往 GitHub 上 Gutenberg 项目区块库的 src 目录,找到段落区块并打开 block.json 文件 。attributes 属性提供了段落区块属性的列表。
"attributes": {
	"content": {
		"type": "rich-text",
		"source": "rich-text",
		"selector": "p",
		"role": "content"
	},
	"dropCap": {
		"type": "boolean",
		"default": false
	},
	"placeholder": {
		"type": "string"
	},
	"direction": {
		"type": "string",
		"enum": [ "ltr", "rtl" ]
	}
},
以下块在 WordPress 6.9 中支持区块绑定API,因此可以链接到您的自定义字段:
| 支持的区块 | 属性 |
|---|---|
| 段落 | 内容 |
| 标题 | 内容 |
| 图片 | id,url,alt,title,caption |
| 按钮 | text,url,linkTarget,rel |
要将自定义字段连接到 Gutenberg 区块,您必须首先 注册它们 。以下代码通过 WordPress 插件或您的主题的 functions.php 文件 注册一个自定义字段:
add_action( 'init', function() {
	register_post_meta( 'your-post-type', 'myplugin_meta_key', [
		'show_in_rest'  => true,
		'single'        => true,
		'type'          => 'string',
		'description'   => __( 'City name', 'textdomain' ),
		'auth_callback' => 'is_user_logged_in',
	] );
} );
register_post_meta 接受一个定义自定义字段特性的属性数组,文档提供了 完整的列表 。要使自定义字段对 区块绑定API 可用,必须将 show_in_rest 设置为 true。从 WordPress 6.9 开始,string 是唯一支持的类型。
要查看区块绑定API 与自定义字段的结合效果,请创建一个新的 WordPress 插件并使用上述代码注册一个元字段。
<?php
/**
 * Plugin Name: Block Bindings example
 * Description: Example plugin that uses the Block Bindings API.
 * Version: 1.0.0
 * Author: Your Name
 * License: GPL2 or later
 * Text Domain: block-bindings-example
 */

if ( ! defined( 'ABSPATH' ) ) {
	exit;
}

add_action( 'init', function() {
	register_post_meta( '', 'block_bindings_image_url', [
		'show_in_rest'  => true,
		'single'	    => true,
		'type'		    => 'string',
		'description'   => __( 'City name', 'block-bindings-example' ),
		'auth_callback' => 'is_user_logged_in',
	] );
} );
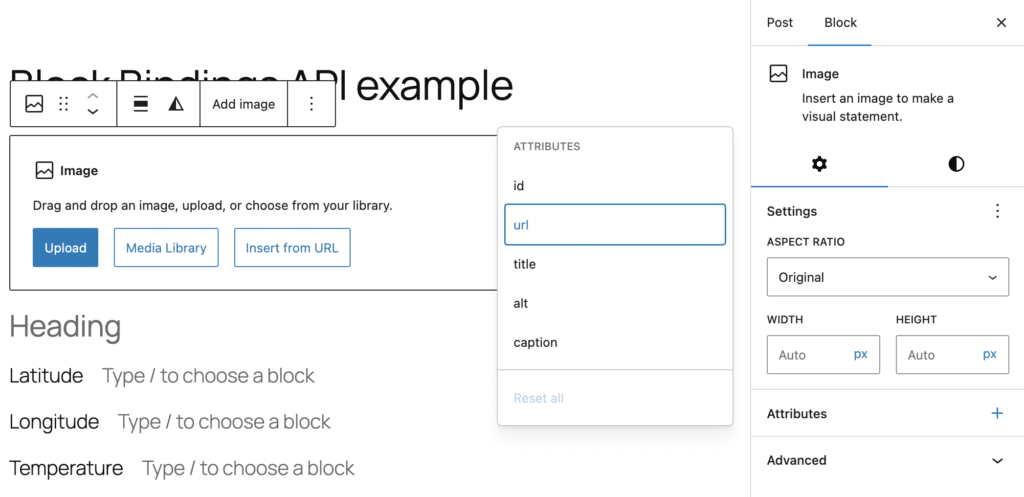
在你的 WordPress 后台仪表盘中激活插件。然后,进入“文章”屏幕并创建一个新文章。当你选择一个受支持的区块时,区块设置侧边栏中的 属性 面板将显示可以绑定到已注册自定义字段的属性列表。
![图片[1]-WordPress区块绑定API介绍及使用它来构建动态网站-主题铺](https://cdn.zhutipu.com/wp-content/uploads/2026/01/20260105173933717.png/ztp)
在右上角打开选项菜单并选择偏好设置 。在常规选项卡中,找到高级部分并启用自定义字段。保存更改,等待页面重新加载,然后返回编辑器。
![图片[2]-WordPress区块绑定API介绍及使用它来构建动态网站-主题铺](https://cdn.zhutipu.com/wp-content/uploads/2026/01/20260105173944938.png/ztp)
信息
我们假设想要手动添加自定义字段。创建一个简化插入自定义字段的 界面 超出了本文的范围。
下一步是插入一个图片区块。选中该区块后,点击 + 图标,在 属性 面板中选择 url 属性。此时,属性面板将显示可用的元字段列表。再次选择 url。现在,您将看到当前文章类型可用的元字段列表。
![图片[3]-WordPress区块绑定API介绍及使用它来构建动态网站-主题铺](https://cdn.zhutipu.com/wp-content/uploads/2026/01/20260105173954124.png/ztp)
选择你的元字段并保存文章。现在你应该在编辑器和前端页面中都看到你的图片了。
![图片[4]-WordPress区块绑定API介绍及使用它来构建动态网站-主题铺](https://cdn.zhutipu.com/wp-content/uploads/2026/01/20260105174000703.png/ztp)
从 WordPress 6.7 版本 开始,您可以使用 Label 属性在编辑器界面中显示文本。以下代码区块展示了一个示例:
add_action( 'init', function() {
	register_post_meta( '', 'block_bindings_image_url', [
		'show_in_rest'  => true,
		'single'        => true,
		'type'          => 'string',
		'description'   => __( 'City image', 'block-bindings-example' ),
		'label'         => __('Image URL'),
		'auth_callback' => 'is_user_logged_in',
	] );
} );![图片[5]-WordPress区块绑定API介绍及使用它来构建动态网站-主题铺](https://cdn.zhutipu.com/wp-content/uploads/2026/01/20260105174006835.png/ztp)
当您打开代码编辑器时,可以在图片区块分隔符内看到一个 JSON 对象。metadata.bindings.url 属性显示了图片区块的 url 与一个元数据字段的关联。
<!-- wp:image {
	"metadata":{
		"bindings":{
			"url":{
				"source":"core/post-meta",
				"args":{
					"key":"block_bindings_image_url"
				}
			}
		}
	}
} -->
<figure class="wp-block-image"><img alt="/></figure>
<!-- /wp:image -->
source 属性指定了区块绑定的数据源。args.key 属性建立了与您元数据字段的引用。
区块绑定 API 最有趣的一个方面是它能够注册自定义数据源,这为开发者打开了许多令人兴奋的新可能性。接下来,我们将探讨如何使用区块绑定 API 从第三方服务获取数据。
如何注册自定义区块绑定数据源:一个真实案例
一旦您熟悉了区块绑定 API 的基本概念,我们就可以进一步探讨它对开发者来说更高级且有趣的一些方面。
如前所述,区块绑定 API 允许您注册自定义数据源。这使您可以从远程源获取数据和/或对原始数据进行操作,以生成可自动插入到您内容中的有用信息。
在本节中,您将通过一个实用示例学习如何充分发挥区块绑定的潜力,该示例可作为开发您自己的自定义应用程序的基础。
重要
请注意,以下示例中提供的代码仅用于演示目的,不应用于生产环境。
假设您想从外部数据源获取数据并在您的文章、页面或 自定义文章类型 中显示。例如,您可以通过发送包含城市纬度和经度的请求来查询天气服务 API,以获取实时天气数据,然后将其显示在您的网站上。
得益于区块绑定 API,您可以显示当前温度,或为读者提供未来几天的天气预报。您还可以根据天气状况,程序化地更改页面上一个或多个图片的 url 属性。
要将此功能添加到您的 WordPress 网站中,您需要创建一个插件。请按照以下步骤操作:
步骤 1:创建基本插件
第一步是创建插件文件。进入您的 WordPress 安装目录中的 wp-content/plugins 文件夹,并创建一个名为 block-bindings-example 的新文件夹。在此文件夹中,添加以下文件:
/wp-content/plugins/
└── /block-bindings-example/
	├── block-bindings-example.php
	└── /includes/
		├── binding-sources.php
		├── meta-fields.php
		└── weather-api.php
打开你最喜欢的 block-bindings-example.php 文件,并添加以下代码:
<?php
/**
 * Plugin Name: Block Bindings Example
 * Description: Use WordPress Block Bindings API (6.5+) to dynamically bind weather data from Open-Meteo API to Gutenberg blocks using custom post meta and a custom binding source.
 * Version: 1.0.0
 * Author: Your Name
 * License: GPL2 or later
 * Text Domain: block-bindings-example
 */

if ( ! defined( 'ABSPATH' ) ) {
	exit; // Exit if accessed directly
}

/**
 * Cache duration for weather data: 30 minutes
 * This reduces API calls and improves performance
 */
define( 'BB_WEATHER_CACHE_TIME', HOUR_IN_SECONDS / 2 );

require_once plugin_dir_path( __FILE__ ) . 'includes/meta-fields.php';
require_once plugin_dir_path( __FILE__ ) . 'includes/binding-sources.php';
require_once plugin_dir_path( __FILE__ ) . 'includes/weather-api.php';

/**
 * Setup function
 */
function bb_init_setup() {
	bb_register_post_meta();
	bb_register_binding_sources();
}
add_action( 'init', 'bb_init_setup' );
这段代码的作用是:
- 常量
BB_WEATHER_CACHE_TIME决定了天气数据的缓存时间。这可以减少 API 调用次数,提升页面性能,并降低服务成本。 require_once表达式用于包含必要的脚本,以注册元字段、注册绑定源以及从 API 中获取数据。- 设置函数调用了两个用于注册文章元数据字段和自定义绑定源的函数。
步骤 2:注册文章元数据字段
下一步是注册您使用案例所需的元数据字段。打开 meta-fields.php 文件,在 includes 文件夹中,并添加以下代码:
<?php
/**
 * Registers custom post meta fields so they appear in the REST API and Block Bindings editor panel
 */
function bb_register_post_meta() {

	if ( ! function_exists( 'register_post_meta' ) ) {
		return;
	}

	register_post_meta( 'post', 'block_bindings_city_name', [
		'show_in_rest'  => true,
		'single'        => true,
		'type'          => 'string',
		'description'   => __( 'Add city name', 'block-bindings-example' ),
		'label'         => __( 'City name', 'block-bindings-example' ),
		'auth_callback' => 'is_user_logged_in',
	] );

	register_post_meta( 'post', 'block_bindings_image_url', [
		'show_in_rest'  => true,
		'single'        => true,
		'type'          => 'string',
		'description'   => __( 'Add city image URL', 'block-bindings-example' ),
		'label'         => __( 'City image URL', 'block-bindings-example' ),
		'auth_callback' => 'is_user_logged_in',
	] );

	register_post_meta( 'post', 'block_bindings_city_lat', [
		'show_in_rest'  => true,
		'single'        => true,
		'type'          => 'string',
		'description'   => __( 'Add city latitude', 'block-bindings-example' ),
		'label'         => __( 'Latitude', 'block-bindings-example' ),
		'auth_callback' => 'is_user_logged_in',
	] );

	register_post_meta( 'post', 'block_bindings_city_lng', [
		'show_in_rest'  => true,
		'single'        => true,
		'type'          => 'string',
		'description'   => __( 'Add city longitude', 'block-bindings-example' ),
		'label'         => __( 'Longitude', 'block-bindings-example' ),
		'auth_callback' => 'is_user_logged_in',
	] );
}
register_post_meta 函数用于在文章中注册一个元数据键。请注意,要使用通过这种方式注册的元数据字段与 区块绑定API 配合,必须将 show_in_rest 设置为 true,并将 type 设置为 string。
步骤3:注册区块绑定源
现在是时候注册你的绑定源了。打开 binding-sources.php 文件并添加以下代码:
<?php
/**
 * Registers a custom Block Bindings source: bb/weather-condition
 */
function bb_register_binding_sources() {

	if ( ! function_exists( 'register_block_bindings_source' ) ) {
		return;
	}

	register_block_bindings_source(
		'bb/weather-condition',
		[
			'label'              => __( 'Weather Condition', 'block-bindings-example' ),
			'get_value_callback' => 'bb_get_weather_condition_value',
			'uses_context'       => [ 'postId' ], // We need postId to get meta values
		]
	);
}
register_block_bindings_source() 函数需要绑定源的名称以及一个回调函数,该函数从源中获取数据并返回处理后的值。
然后,在同一个 binding-sources.php 文件中定义回调函数。
function bb_get_weather_condition_value( array $source_args, WP_Block $block_instance ) {

	$key = $source_args['key'] ?? null;
	if ( ! $key ) {
		return null;
	}

	// Get current post ID from block context (always available in post content)
	$post_id = $block_instance->context['postId'] ?? null;

	// Fallback: use global loop if context is missing
	if ( ! $post_id && in_the_loop() ) {
		$post_id = get_the_ID();
	}

	if ( ! $post_id || $post_id <= 0 ) {
		error_log( 'BB DEBUG: Could not determine post ID for weather binding' );
		return null;
	}

	$weather_data = bb_fetch_and_cache_weather_data( $post_id );

	if ( ! is_array( $weather_data ) || ! isset( $weather_data[ $key ] ) ) {
		return null;
	}

	$value = $weather_data[ $key ];

	// Append °C symbol for temperature
	if ( $key === 'temperature' ) {
		return $value . '°C';
	}

	return $value;
}
让我们来分解这个函数:
$source_args['key']用于标识绑定到区块属性的数据。- 下一行从
context中获取当前文章的 ID。如果context不存在,例如在预览时,就会使用get_the_ID()获取当前文章的 ID。 - 然后,它调用
bb_fetch_and_cache_weather_data函数,该函数从 API 中获取数据。我们将在下一步中定义这个函数。 $weather_data[$key]包含由 API 提供的数据,例如温度和天气状态。- 如果键是
temperature,它会将°C追加到提供的值上。 - 然后函数返回最终的值。
步骤 4: 从外部源获取数据
如上所述,我们从 Open-Meteo 服务 (非商业用途免费)获取数据。
要获取当前位置的当前温度和天气状况,需要向 API 发送一个包含给定位置的纬度和经度以及查询变量 current=weather_code,temperature_2m 的请求。以下是一个示例请求:
https://api.open-meteo.com/v1/forecast?latitude=-33.8717&longitude=151.2299¤t=weather_code,temperature_2m该 API 返回的响应类似于以下内容:
{
	"latitude": -33.8717,
	"longitude": 151.2299,
	"generationtime_ms": 0.030875205993652344,
	"utc_offset_seconds": 0,
	"timezone": "GMT",
	"timezone_abbreviation": "GMT",
	"elevation": 13.0,
	"current_units": {
		"time": "iso8601",
		"interval": "seconds",
		"weather_code": "wmo code",
		"temperature_2m":"°C"
	},
	"current": {
		"time": "2025-12-01T16:00",
		"interval": 900,
		"weather_code": 3,
		"temperature_2m":7.3
	}
}![图片[6]-WordPress区块绑定API介绍及使用它来构建动态网站-主题铺](https://cdn.zhutipu.com/wp-content/uploads/2026/01/20260105174028919.png/ztp)
现在你已经知道如何获取所需的数据,打开 weather-api.php 文件并添加以下代码:
function bb_fetch_and_cache_weather_data( $post_id ) {
	$lat = get_post_meta( $post_id, 'block_bindings_city_lat', true );
	$lng = get_post_meta( $post_id, 'block_bindings_city_lng', true );

	$lat = str_replace( ',', '.', trim( $lat ) );
	$lng = str_replace( ',', '.', trim( $lng ) );

	if ( ! is_numeric( $lat ) || ! is_numeric( $lng ) ) {
		error_log( 'BB DEBUG: Invalid latitude/longitude values after normalization' );
		return false;
	}

	$transient_key = 'bb_weather_data_' . $post_id;
	$cached_data   = get_transient( $transient_key );

	if ( $cached_data !== false ) {
		error_log( "BB DEBUG: Cache hit for post ID {$post_id}" );
		return $cached_data;
	}

	// Build Open-Meteo API URL
	$api_url = sprintf(
		'https://api.open-meteo.com/v1/forecast?latitude=%s&longitude=%s¤t=weather_code,temperature_2m',
		rawurlencode( $lat ),
		rawurlencode( $lng )
	);

	error_log( "BB DEBUG: Fetching weather data from: {$api_url}" );

	$response = wp_remote_get( $api_url, [ 'timeout' => 10 ] );

	if ( is_wp_error( $response ) ) {
		error_log( 'BB DEBUG: API request failed – ' . $response->get_error_message() );
		return false;
	}

	if ( wp_remote_retrieve_response_code( $response ) !== 200 ) {
		error_log( 'BB DEBUG: API returned non-200 status code' );
		return false;
	}

	$body = wp_remote_retrieve_body( $response );
	$data = json_decode( $body, true );

	if ( ! $data || ! isset( $data['current'] ) ) {
		error_log( 'BB DEBUG: Invalid or empty API response' );
		return false;
	}

	$temperature  = $data['current']['temperature_2m'] ?? null;
	$weather_code = $data['current']['weather_code'] ?? 0;

	$mapped_data = [
		'temperature'    => round( (float) $temperature ),
		'weather_state'  => bb_map_wmo_code_to_state( (int) $weather_code ),
	];

	// Cache for 30 minutes
	set_transient( $transient_key, $mapped_data, BB_WEATHER_CACHE_TIME );

	error_log( 'BB DEBUG: Weather data fetched and cached successfully' );

	return $mapped_data;
}
此函数从 Open-Meteo API 获取当前天气数据,并使用 transients 将其存储在缓存中。我们来仔细看一下。
- 两次调用
get_post_meta会获取您所在位置的纬度和经度。 - 以下两行代码用于规范化小数点,以防用户输入的是逗号而不是句点。
- 条件区块使用
is_numeric()检查值是否为数字格式。 - 接下来,它会检查数据是否已缓存。如果已缓存,则返回缓存数据并停止函数,而不会向 API 发送任何请求。
- 如果缓存中没有找到数据,它会构建请求并存储响应。
- 以下几行提供了
temperature和weather_code。 weather_code通过bb_map_wmo_code_to_state函数映射到weather_state,该函数定义如下。- 数据通过
set_transient保存。 - 最后,函数返回映射后的数据。
最后,定义一个将 weather_code 转换为人类可读字符串的函数:
function bb_map_wmo_code_to_state( $code ) {
	if ( $code >= 0 && $code <= 3 ) {
		return 'clear';
	} elseif ( $code >= 51 && $code <= 67 ) {
		return 'rainy';
	} elseif ( $code >= 71 && $code <= 77 ) {
		return 'snowy';
	} elseif ( $code >= 95 ) {
		return 'thunderstorm';
	}
	return 'cloudy';
}
代码已编写完成,您的插件已准备好进行测试。
如何使用区块绑定 API
是时候学习如何使用区块绑定 API 为您的网站添加新功能了!
在您的 WordPress 后台,导航到插件页面并激活您刚刚创建的 区块绑定 示例 插件。
![图片[7]-WordPress区块绑定API介绍及使用它来构建动态网站-主题铺](https://cdn.zhutipu.com/wp-content/uploads/2026/01/20260105174037305.png/ztp)
之后,创建一个新文章或页面。添加一个图片区块、一个标题,以及四个包含两个段落的行区块,如下图所示。然后保存文章。
![图片[8]-WordPress区块绑定API介绍及使用它来构建动态网站-主题铺](https://cdn.zhutipu.com/wp-content/uploads/2026/01/20260105174043571.png/ztp)
接下来,添加您的自定义字段,然后再次保存文章。
![图片[9]-WordPress区块绑定API介绍及使用它来构建动态网站-主题铺](https://cdn.zhutipu.com/wp-content/uploads/2026/01/20260105174050917.png/ztp)
选择图片区块,在区块设置侧边栏中找到属性面板。点击 + 按钮打开下拉菜单,该菜单会显示支持区块绑定的图片区块属性列表。选择 url 项。
![图片[10]-WordPress区块绑定API介绍及使用它来构建动态网站-主题铺](https://cdn.zhutipu.com/wp-content/uploads/2026/01/20260105174058881.png/ztp)
在选择区块属性后, 高级选项卡将显示一个新的 URL 元素,描述为“未连接”。再次点击 url 项以查看可用的绑定源列表。Post Meta 提供了为文章类型注册的四个自定义字段及其相应的值。选择城市图片 URL。
![图片[11]-WordPress区块绑定API介绍及使用它来构建动态网站-主题铺](https://cdn.zhutipu.com/wp-content/uploads/2026/01/20260105174106833.png/ztp)
你已将城市图片 URL 元字段分配给了图片区块的 url 属性。现在你应该能看到你选择的城市的照片。
按照相同的过程处理其他元字段。将城市名称字段分配给标题区块的 content 属性,将纬度和经度字段分配给对应的段落区块。
现在,将最后两个区块连接到你的自定义绑定源。不幸的是,正如你之前看到的截图所示,这个选项在编辑器的 UI 中不可用。
目前,你需要切换到代码编辑器,并手动编写与你的绑定源相关的两个区块的标记。以下是显示由 Open-Meteo 服务提供的温度的代码:
<!-- wp:paragraph {
	"metadata":{
		"bindings":{
			"content":{
				"source":"bb/weather-condition",
				"args":{
					"key":"temperature"
				}
			}
		}
	}
} -->
<p>Placeholder</p>
<!-- /wp:paragraph -->使用此方法,您的绑定源名称将在编辑器中显示为天气状况 ,但实际数据仅在前端可见。
![图片[12]-WordPress区块绑定API介绍及使用它来构建动态网站-主题铺](https://cdn.zhutipu.com/wp-content/uploads/2026/01/20260105174113763.png/ztp)
显然,手动在区块标记中添加 JSON 对象并不是一种用户友好的过程。幸运的是,WordPress 6.9 对 区块绑定 API 进行了重大改进,使得为自定义数据源创建 UI 变得可能。让我们尝试通过自定义 UI 来改进我们的插件。
如何为您的自定义区块绑定数据源创建 UI
重要
我们推迟了该项目的这一部分,因为所需功能仅在 WordPress 6.9 及更高版本中可用。如果你使用的是更早版本的 WordPress,以下代码将无法正常运行。
要为你的自定义绑定源创建 UI,你需要编写一些 JavaScript 代码。首先,在 /includes 目录下创建一个 js 子文件夹,然后在其中创建一个 block-bindings-ui.js 文件。插件的结构现在如下:
/wp-content/plugins/
└── /block-bindings-example/
	├── block-bindings-example.php
	└── /includes/
		├── binding-sources.php
		├── meta-fields.php
		└── weather-api.php
			└── /js/
				└──	block-bindings-ui.js
作为第一步,将 JS 脚本添加到插件的主文件中:
function bb_enqueue_weather_bindings_ui() {

	if ( ! function_exists( 'register_block_bindings_source' ) ) {
		return;
	}

	$js_file_path = plugin_dir_path( __FILE__ ) . 'includes/js/block-bindings-ui.js';

	if ( ! file_exists( $js_file_path ) ) {
		return;
	}

	// Enqueue the script only in the editor
	wp_enqueue_script(
		'bb-weather-bindings-ui',
		plugin_dir_url( __FILE__ ) . 'includes/js/block-bindings-ui.js',
		[ 'wp-blocks', 'wp-element', 'wp-dom-ready', 'wp-block-bindings' ],
		filemtime( $js_file_path ),
		true
	);
}
add_action( 'enqueue_block_editor_assets', 'bb_enqueue_weather_bindings_ui' );
这个函数的作用如下:
- 首先,它会检查
register_block_bindings_source()函数是否存在。 - 接下来,它会检查插件的
/includes/js文件夹中是否存在block-bindings-ui.js文件。 wp_enqueue_script()函数用于在编辑器中注册脚本。- 它使用
enqueue_block_editor_assets钩子 来排队编辑界面的脚本。
现在打开 block-bindings-ui.js 文件并编写以下代码:
wp.blocks.registerBlockBindingsSource({
	name: 'bb/weather-condition',
	label: 'Weather Condition',
	useContext: [ 'postId', 'postType' ],
	getValues: ( { bindings } ) => {
		if ( bindings.content?.args?.key === 'temperature' ) {
			return {
				content: 'Current temperature provided by Open-Meteo.',
			};
		}
		if ( bindings.content?.args?.key === 'weather_state' ) {
			return {
				content: 'Current conditions.',
			};
		}
		return {
			content: bindings.content,
		};
	},
	getFieldsList() {
		return [
			{ label: 'Temperature (°C)',   type: 'string', args: { key: 'temperature' } },
			{ label: 'Weather Conditions',  type: 'string', args: { key: 'weather_state' } }
		];
	}
});- `registerBlockBindingsSource()` 函数用于在区块编辑器中注册一个绑定源。
- 名称是您绑定源的唯一标识符。它必须与在 PHP 中使用
register_block_bindings_source()时的名称完全匹配。 - 标签是显示在 属性 面板的 源 下拉菜单中的人可读名称。
useContext设置此源从区块中需要的上下文值。postId是必需的,以便源知道要读取哪个帖子的元数据或天气数据。getValues提供了在区块编辑器中绑定值的预览。它返回用户选择绑定源(如我们的示例“天气状况”)后下拉菜单中显示的选项。此方法自 WordPress 6.9 起可用。getFieldsList返回在用户选择绑定源(如我们的示例中的“天气状况”)后下拉菜单中出现的选项。
保存文件并返回编辑器。您的 Weather Conditions 源现在已出现在编辑器 UI 中,与 Post Meta 一起。重新加载页面,然后将一个段落或标题区块连接到您的绑定源。下图显示了结果。
![图片[13]-WordPress区块绑定API介绍及使用它来构建动态网站-主题铺](https://cdn.zhutipu.com/wp-content/uploads/2026/01/20260105174123343.png/ztp)
最终的图片展示了网站前端的效果。
![图片[14]-WordPress区块绑定API介绍及使用它来构建动态网站-主题铺](https://cdn.zhutipu.com/wp-content/uploads/2026/01/20260105174129265.png/ztp)
区块绑定 API 还能做些什么?
本文仅触及了区块绑定API 可以构建内容的冰山一角。令人振奋的是,这一强大 WordPress 功能的开发远未结束,我们未来可以期待更多新的实现和功能添加。
将区块绑定API 与其他强大的 WordPress API(如 交互性 API)集成,可以构建动态、交互性强的应用程序,其功能远远超越了早期使 WordPress 受欢迎的传统博客功能。
WordPress 不再只是一个博客平台或网站构建工具。它现在正准备成为各种类型网络应用的多功能开发平台。
你的应用程序越强大,你的托管服务就越重要。Kinsta 提供性能卓越、安全稳固、自动化功能丰富且支持出色的 Premium 管理型托管服务,被 G2 用户 认可为行业领先。








暂无评论内容